Thursday, December 27, 2012

ActiveMQ: High Performance Messaging Using LevelDB

ActiveMQ is already built for high performance and is one of the fastest brokers available but did you know it can be even faster by configuring the LevelDB message store?  LevelDB is a fast light weight key-value storage system which maps byte keys to byte values.

Not too long ago I came across an issue where the ActiveMQ broker seems to be experiencing a performance issue.  This issue arose from a very specific use case, none the less it has highlighted the exceptional performance of the LevelDB store.  This use case involved durable topic subscribers with selectors; one subscriber with no selector to receive all messages, one subscriber with a selector of "true", and one subscriber with a selector of "false".  A producer was then configure to alternate the property set on the message to "true" and "false".

Using the kahaDB store I saw that it would take upwards of 7 hours for 200,000 messages to be published to the broker.  Out of curiosity I switch to the LevelDB store and saw the exact same scenario only took 70 seconds.  This was absolutely amazing!

If you are interested in enabling the LevelDB store it can be configured with a couple simple steps.  Depending on the version of the broker you are running there are different instructions.

Fuse Distributions

First, download the fuse-leveldb-1.3-uber.jar (which is the latest at the time of this writing) and copy the JAR into the broker's lib directory.  Then, in the broker configuration file (activemq.xml) update the persistence adapter to use the LevelDB store as follows:

 <persistenceAdapter>  
  <bean xmlns="http://www.springframework.org/schema/beans"   
    class="org.fusesource.mq.leveldb.LevelDBStore">  
   <property name="directory" value="${activemq.base}/data/leveldb"/>  
   <property name="logSize" value="107374182"/>  
  </bean>  
 </persistenceAdapter>  

Apache Distributions

The Apache distribution of ActiveMQ 5.7 and greater come with the LevelDB library so all you need to do is enable the persistence adapter in the broker configuration:

 <persistenceAdapter>  
  <levelDB directory="${activemq.base}/data/leveldb" logSize="107374182"/>  
 </persistenceAdapter>  

That's all there is to it.  For more information on the ActiveMQ LevelDB store and performance metrics check out the GitHub project page at FuseMQ-LevelDB.  For a list of all the available binaries for the fuse-leveldb library have a look at this fusesource repository.

Monday, November 5, 2012

ActiveMQ: Securing the ActiveMQ Web Console in Tomcat

This post will demonstrate how to secure the ActiveMQ WebConsole with a username and password when deployed in the Apache Tomcat web server.  The Apache ActiveMQ documentation on the Web Console provides a good example of how this is done for Jetty, which is the default web server shipped with ActiveMQ, and this post will show how this is done when deploying the web console in Tomcat.

To demonstrate, the first thing you will need to do is grab the latest distribution of ActiveMQ.  For the purpose of this demonstration I will be using the 5.5.1-fuse-09-16 release which can be obtained via the Red Hat Support Portal or via the FuseSource repository:
Once you have the distributions, extract and start the broker.  If you don't already have Tomcat installed you can grab it from the link above as well.  I am using Tomcat 6.0.36 in this demonstration.  Next, create a directory called activemq-console in the Tomcat webapps directory and extract the ActiveMQ Web Console war by using the jar -xf command.  

With all the binaries installed and our broker running we can begin configuring our web app and Tomcat to secure the Web Console.  First, open the ActiveMQ Web Console's web descriptor, this can be found in the following location: activemq-console/WEB-INF/web.xml, and add the following configuration:

 <security-constraint>  
   <web-resource-collection>  
     <web-resource-name>Authenticate entire app</web-resource-name>  
     <url-pattern>/*</url-pattern>  
        <http-method>GET</http-method>  
        <http-method>POST</http-method>  
   </web-resource-collection>  
   <auth-constraint>  
        <role-name>activemq</role-name>  
   </auth-constraint>  
   <user-data-constraint>  
        <!-- transport-guarantee can be CONFIDENTIAL, INTEGRAL, or NONE -->  
     <transport-guarantee>NONE</transport-guarantee>  
   </user-data-constraint>  
  </security-constraint>  
  <login-config>  
   <auth-method>BASIC</auth-method>  
  </login-config>  

This configuration enables the security constraint on the entire application as noted with /* url-pattern.  Another point to notice is the auth-constraint which has been set to the activemq role, we will define this shortly.  And lastly, note that this is configured for basic authentication.  This means the username password are base64 encoded but not truly encrypted.  To improve the security further you could enable a secure transport such as SSL.

Now lets configure the Tomcat server to validate our activemq role we just specified in the web app.  Out-of-the-box Tomcat is configured to use the UserDataBaseRealm.  This is configured in [TOMCAT_HOME]/conf/server.xml.  This instructs the web server to validate against the tomcat-users.xml file which can be found in [TOMCAT_HOME]/conf as well.  Open the tomcat-users.xml file and add the following:

 <role rolename="activemq"/>  
 <user username="admin" password="admin" roles="activemq"/>  

This defines our activemq role and configures a user with that role.

The last thing we need to do before starting our Tomcat server is add the required configuration to communicate with the broker.  First, copy the activemq-all jar into the Tomcat lib directory.  Next, open the catalina.sh/catalina.bat startup script and add the following configuration to initialize the JAVA_OPTS variable:

 JAVA_OPTS="-Dwebconsole.jms.url=tcp://localhost:61616 -Dwebconsole.jmx.url=service:jmx:rmi:///jndi/rmi://localhost:1099/jmxrmi -Dwebconsole.jmx.user= -Dwebconsole.jmx.password="  

Now we are ready to start the Tomcat server.  Once started, you should be able to access the ActiveMQ Web Console at the following URL: http://localhost:8080/activemq-console.  You should be prompted with something similar to this dialog:


Once you enter the user name and password you should get logged into the ActiveMQ Web Console.  As I mentioned before the user name and password are base64 encoded and each request is authenticated against the UserDataBaseRealm.  The browser will retain your username and password in memory so you will need to exit the browser to end the session.

What you have seen so far is a simple authentication using the UserDataBaseRealm which contains a list of users in a text file.  Next we will look at configuring the ActiveMQ Web Console to use a JDBCRealm which will authenticate against users stored in a database.

Lets first create a new database as follows using a MySQL database:

 mysql> CREATE DATABASE tomcat_users;  
 Query OK, 1 row affected (0.00 sec)  
 mysql>   

Provide the appropriate permissions for this database to a database user:

 mysql> GRANT ALL ON tomcat_users.* TO 'activemq'@'localhost';  
 Query OK, 0 rows affected (0.02 sec)  
 mysql>  

Then you can login to the database and create the following tables:

 mysql> USE tomcat_users;  
 Database changed  
 mysql> CREATE TABLE tomcat_users (  
   -> user_name varchar(20) NOT NULL PRIMARY KEY,  
   -> password varchar(32) NOT NULL  
   -> );  
 Query OK, 0 rows affected (0.10 sec)  
 mysql> CREATE TABLE tomcat_roles (  
   -> role_name varchar(20) NOT NULL PRIMARY KEY  
   -> );  
 Query OK, 0 rows affected (0.05 sec)  
 mysql> CREATE TABLE tomcat_users_roles (  
   -> user_name varchar(20) NOT NULL,  
   -> role_name varchar(20) NOT NULL,  
   -> PRIMARY KEY (user_name, role_name),  
   -> CONSTRAINT tomcat_users_roles_foreign_key_1 FOREIGN KEY (user_name) REFERENCES tomcat_users (user_name),  
   -> CONSTRAINT tomcat_users_roles_foreign_key_2 FOREIGN KEY (role_name) REFERENCES tomcat_roles (role_name)  
   -> );  
 Query OK, 0 rows affected (0.06 sec)  
 mysql>   

Next seed the tables with the user and role information:

 mysql> INSERT INTO tomcat_users (user_name, password) VALUES ('admin', 'dbpass');  
 Query OK, 1 row affected (0.00 sec)  
 mysql> INSERT INTO tomcat_roles (role_name) VALUES ('activemq');  
 Query OK, 1 row affected (0.00 sec)  
 mysql> INSERT INTO tomcat_users_roles (user_name, role_name) VALUES ('admin', 'activemq');  
 Query OK, 1 row affected (0.00 sec)  
 mysql>   

Now we can verify the information in our database:

 mysql> select * from tomcat_users;  
 +-----------+----------+  
 | user_name | password |  
 +-----------+----------+  
 | admin   | dbpass  |  
 +-----------+----------+  
 1 row in set (0.00 sec)  
 mysql> select * from tomcat_users_roles;  
 +-----------+-----------+  
 | user_name | role_name |  
 +-----------+-----------+  
 | admin   | activemq |  
 +-----------+-----------+  
 1 row in set (0.00 sec)  
 mysql>   

If you left the Tomcat server running from the first part of this demonstration shut it down at this time so we can change the configuration to use the JDBCRealm.  In the server.xml file, located in [TOMCAT_HOME]/conf, we need to comment out the existing UserDataBaseRealm and add the JDBCRealm:

 <!--  
    <Realm className="org.apache.catalina.realm.UserDatabaseRealm"  
        resourceName="UserDatabase"/>  
 -->  
    <Realm className="org.apache.catalina.realm.JDBCRealm"  
        driverName="com.mysql.jdbc.Driver"  
        connectionURL="jdbc:mysql://localhost/tomcat_users?user=activemq&amp;password=activemq"  
        userTable="tomcat_users" userNameCol="user_name" userCredCol="password"  
        userRoleTable="tomcat_users_roles" roleNameCol="role_name" />  

Looking at the JDBCRealm, you can see we are using the mysql JDBC driver, the connection URL is configured to connect to the tomcat_users database using the specified credentials, and the table and column names used in our database have been specified.

Now the Tomcat server can be started again.  This time when you login to the ActiveMQ Web Console use the username and password specified when loading the database tables.

That's all there is to it, you now know how to configure the ActiveMQ Web Console to use Tomcat's UserDatabaseRealm and JDBCRealm.

The following sites were helpful in gathering this information:

http://activemq.apache.org/web-console.html
http://www.avajava.com/tutorials/lessons/how-do-i-use-a-jdbc-realm-with-tomcat-and-mysql.html?page=1
http://oreilly.com/pub/a/java/archive/tomcat-tips.html?page=1

Tuesday, October 30, 2012

ActiveMQ: KahaDB Journal Files - More Than Just Message Content Bits

I recently came across an issue where the ActiveMQ KahaDB journal files were continually rolling despite the fact that only a small number of small persistent messages were occasionally being stored by the broker.  This behavior seemed very strange being that the message sizes being persisted were only a couple of kilobytes and there was a relatively small amount of messages actually on a queue.  In this scenario something was filling up the 32MB journal files, but I wasn't quite sure what it could be?  Were there other messages somewhere in the broker?  Did an index get corrupted that was actually causing messages to be written across multiple journal files?  It was pretty strange behavior but it can be explained fairly easily.  This post describes the actual cause of this behavior and I have created it to remind myself in the future that there is more in the journal file than just the message content bits.

The KahaDB journal files are used to store persistent messages that have been sent to the broker.  In addition to storing the message content, the journal files also store information on KahaDB commands and transactional information.  There are several commands for which information is stored; KahaAddMessageCommand, KahaCommitCommand, KahaPrepareCommand, KahaProducerAuditCommand, KahaRemoveDestinationCommand, KahaRemoveMessageCommand, KahaRollbackCommand, KahaSubscriptionCommand, and KahaTraceCommand.  In this particular case, it was the KahaProducerAuditCommand which was responsible for the behavior that was observed.  This command stores information about producer ids and message ids which is used for duplicate detection.  In this case information is stored in a map object which over time grows.  This information is then stored in the journal file each time a checkpoint is run, which by default is every 5 seconds.  Over time, this can begin to use up the space allocated by the journal file causing low volume smaller messages to roll to the next journal file which in turn prevents the broker from cleaning up journal files which still have referenced messages.  Eventually this situation can lead to Producer Flow Control being trigger by the broker's store limit which prevents producers from sending new messages into the broker.

This behavior can occur under the following conditions:
  • Persistent messages are being sent to a queue
  • The messages are not being consumed on a regular basis
  • The rate of messages being sent to the broker is low
These conditions allow for this behavior to be observed fairly easily.  As the persistent messages do not get consumed they remain referenced and prevent the journal files from being cleaned up.  The low message rate allows time to pass between each new message being stored in the journal file and in the meantime checkpoints are being run which cause KahaProducerAuditCommand information to space out the actual messages within the journal file.

For this use case you can disable the duplicate detection by essentially limiting the growth of the KahaProducerAuditCommand using the following configuration on the persistent adapter in the broker configuration:

 <persistenceAdapter>  
       <kahaDB directory="${activemq.base}/data/kahadb" failoverProducersAuditDepth="0" maxFailoverProducersToTrack="0"/>  
 </persistenceAdapter>  

 This is something to think about when designing your system.  Under normal circumstances, if you have consumers available to consume the persistent messages, this condition would probably never occur as the journal files roll and messages are consumed, the broker can begin to clean up old journal files.

There is currently an enhancement request at Apache which will also help resolve this issue.  AMQ-3833 has been opened to enhance the broker so it will only write the KahaProducerAuditCommand if a change has occurred since the last checkpoint.  This will help reduce the amount of data that is written to the journal files in between message storage.

Wednesday, August 1, 2012

Android: MQTT with ActiveMQ

I have been wanting to create a simple demo for a while that sends a message from an Android device to ActiveMQ.  With ActiveMQ 5.6 the broker was enhanced with the MQTT protocol.  The MQTT protocol is a very light weight publish/subscribe messaging protocol that is ideal for use in portable devices such as phones and tablets where a small footprint is needed and network bandwidth may be limited or unreliable.  So I decided to have a look at the mqtt-client library that Hiram Chirino has been working on to build a little demo app that can be used to publish and subscribe to a JMS topic.  This demo is just the basics and provides the starting point to building something such as a mobile chat application.

Building the Code:

The client library I used for my demo application is the FuseSource MQTT client.  This is a very nice library that supports Blocking, Future, and Callback/Continuation Passing based APIs.  The source for this library is available at the following github repo: mqtt-client.  To run the Android MQTT demo you'll need to clone this repo and build the mqtt-client.

 git clone https://github.com/fusesource/mqtt-client.git  

For the purpose of this demo we are only interested in the mqtt-client so you can change into the mqtt-client directory and run:

 mvn clean install  

You should then see the build was completed successfully.

Now that you have the required library built, lets go a head and download the Android MQTT Client.  The source for this demo is available in the following github repo: android-mqtt-demo.  This repo can be cloned using the following command:

 https://github.com/jsherman1/android-mqtt-demo.git  

Once you have the android-mqtt-demo cloned you can build the source within eclipse using the Android SDK.  To open the project in eclipse, use the new project wizard to create a new Android project and select "Android Project from Existing Code".  Browse to the src files you just cloned and click finish.

Now you will need to add the mqtt-client library to a libs directory in the android-mqtt-demo project so the library will be deployed to the emulator or Android device.  With the mqtt-client library added to libs directory the project should build successfully.  You can now deploy this to an Android device or run it from the Android emulator.  Note this may very depending on the ADT version you are currently running.  I am running with version 20.0.1.  In previous versions you could add the library to the build path and it would automatically get deployed.  For more information on this see the thread on Dealing with dependencies in Android projects.

Running the Demo:

Okay, so now for the fun part; running the demo. The first thing we need to do is start an ActiveMQ 5.6 broker instance that has the MQTT protocol enabled.  This can be done by modifying the broker's configuration file, conf/activemq.xml, as follows to add a mqtt transport connector:
 <transportConnectors>  
   <transportConnector name="openwire" uri="tcp://0.0.0.0:61616"/>  
   <transportConnector name="mqtt" uri="mqtt+nio://0.0.0.0:1883"/>  
 </transportConnectors>  

If you would also like to enable security you could add the simpleAuthenticationPlugin configuration as follows:
 <plugins>  
    <simpleAuthenticationPlugin>  
       <users>  
          <authenticationUser username="system" password="manager" groups="users,admins"/>  
          <authenticationUser username="user" password="password" groups="users"/>  
          <authenticationUser username="guest" password="password" groups="guests"/>  
       </users>  
    </simpleAuthenticationPlugin>  
 </plugins>  

Now you can start the broker and Android MQTT Demo.  When the activity loads enter the URL Address for the MQTT connector, enter the User Name and Password if needed and click connect.  Once connected enter a message and click send.  The application is listening for messages on the same topic so you should see the message appear in the Received text box.


This should also work for the Apollo message broker as well which has a MQTT implementation.

Saturday, June 30, 2012

SerivceMix: Configuring Sift Appender with a Rolling Log File

I have come across several issues where people were having trouble configuring the Sift file appender in ServiceMix to enable per bundle logging.  Specifically, issues arose when trying to configure a rolling log file appender for sift.  This is rather simple and straight forward as you will see in the configuration below.  You simply need to use the org.apache.log4j.RollingFileAppender as you would for any log4j appender.  The important part is ensuring the proper configuration when applying the rolling log file appender to sift.

Lets have a look at the org.ops4j.pax.logging.cfg of the latest distribution of Fuse ESB, which is currently 4.4.1-fuse-03-06.  The Sift appender comes configured as follows:
 # Sift appender  
 log4j.appender.sift=org.apache.log4j.sift.MDCSiftingAppender  
 log4j.appender.sift.key=bundle.name  
 log4j.appender.sift.default=servicemix  
 log4j.appender.sift.appender=org.apache.log4j.FileAppender  
 log4j.appender.sift.appender.layout=org.apache.log4j.PatternLayout  
 log4j.appender.sift.appender.layout.ConversionPattern=%d{ABSOLUTE} | %-5.5p | %-16.16t | %-32.32c{1} | %m%n  
 log4j.appender.sift.appender.file=${karaf.data}/log/$\\{bundle.name\\}.log  
 log4j.appender.sift.appender.append=true  

To enable a rolling log file we need to change:
 log4j.appender.sift.appender=org.apache.log4j.FileAppender
to:
 log4j.appender.sift.appender=org.apache.log4j.RollingFileAppender  

Then we need to add the following properties to enable the rolling log:
 log4j.appender.sift.appender.maxFileSize=10MB   
 log4j.appender.sift.appender.maxBackupIndex=10  

Of course you would configure these properties as required by your application.

Now the Sift appender configured for rolling log files should look as follows:
 # Sift appender  
 log4j.appender.sift=org.apache.log4j.sift.MDCSiftingAppender  
 log4j.appender.sift.key=bundle.name  
 log4j.appender.sift.default=servicemix  
 log4j.appender.sift.appender=org.apache.log4j.RollingFileAppender  
 log4j.appender.sift.appender.layout=org.apache.log4j.PatternLayout  
 log4j.appender.sift.appender.layout.ConversionPattern=%d{ABSOLUTE} | %-5.5p | %-16.16t | %-32.32c{1} | %m%n  
 log4j.appender.sift.appender.file=${karaf.data}/log/$\\{bundle.name\\}.log  
 log4j.appender.sift.appender.append=true  
 log4j.appender.sift.appender.maxFileSize=10MB   
 log4j.appender.sift.appender.maxBackupIndex=10  

That's all there is to it.  You now have a Sift appender configured for rolling log files.  Just remember you also need to have the rootLogger configured as follows to ensure the sift appender is activated.

Note: This is found at the top of the org.ops4j.pax.logging.cfg file.
 log4j.rootLogger=INFO, sift, osgi:VmLogAppender  

Wednesday, May 30, 2012

CamelOne: Check Out The Presentations

Early this month I was fortunate enough to attend the second annual CamelOne event in Boston, MA presented by FuseSource.  The event had three tracks full of great presentations and it was difficult to decide which presentations to attend.  Luckily, all presentations were recorded and will be posted to the CamelOne site.  If you were unable to attend the event, or even if you attended and wanted to see some of the presentations you missed, have a look at the site.

There were some stellar presentations for instance on Large Scale Deployments of Apache Camel in the Cloud by James Strachan where the Fuse IDE product is highlighted.  If you are looking to get a glimpse into the future of Open Source Messaging, have a look at the Next Generation Open Source Messaging with Apollo presentation by Hiram Chirino.  Another presentation that was particularly interesting was Develop Real Time  Applications - HTML 5 using WebSockets, Apache Camel, and ActiveMQ by Charles Moulliard.  There were many more interesting topics including Large Scale Messaging with ActiveMQ for Particle Accelerators at Cern so make sure you check out the full list of presentations at the CamelOne presentation site.

Monday, April 30, 2012

ActiveMQ: How to Start/Stop Camel Routes on an ActiveMQ Slave

Do you have a business requirement in which you need ActiveMQ to deploy your Camel routes but you have come to realize that in a Master/Slave configuration the Camel Context is always started on the slave broker?

In this example I will show you how you can configure ActiveMQ to deploy Camel routes as well as how to control when these routes should be started.  In this example we have a master broker with routes that start when the broker is started.  Additionally, we will have a slave broker which will have routes that we only want to start when the slave becomes the master.

I am currently using the apache-activemq-5.5.1-fuse-04-01, which is the latest release of ActiveMQ from FuseSource at the time of this writing.  You can grab the binaries/source from the following link: apache-activemq-5.5.1-fuse-04-01

So you may be wondering how you might be able to accomplish this, right?  Well luckily, we can easily have something working with just a little code and a little configuration.

Code

The code we need to implement is rather simple.  We just need to create a class that implements the ActiveMQ Service interface.  Below is the simple example I created to demonstrate how this works:

 package com.fusesource.example;  
 import org.apache.activemq.Service;  
 import org.apache.camel.spring.SpringCamelContext;  
 import org.slf4j.Logger;  
 import org.slf4j.LoggerFactory;  
 /**  
  * Example used to start and stop the camel context using the ActiveMQ Service interface  
  *  
  */  
 public class CamelContextService implements Service  
 {  
   private final Logger LOG = LoggerFactory.getLogger(CamelContextService.class);  
   SpringCamelContext camel;  
   @Override  
   public void start() throws Exception {  
     try {  
       camel.start();  
     } catch (Exception e) {  
       LOG.error("Unable to start camel context: " + camel);  
       e.printStackTrace();  
     }  
   }  
   @Override  
   public void stop() throws Exception {  
     try {  
       camel.stop();  
     } catch (Exception e) {  
       LOG.error("Unable to stop camel context: " + camel);  
       e.printStackTrace();  
     }  
   }  
   public SpringCamelContext getCamel() {  
     return camel;  
   }  
   public void setCamel(SpringCamelContext camel) {  
     this.camel = camel;  
   }  
 }  

The magic behind all this is in the Service interface.  When this class is registered as a service with the broker, the start method will be called when the broker is fully initialized.  Remember to copy the jar file to the lib directory of the broker where you want this code to be invoked.

Configuration

First let's have a look at how we deploy Camel routes from ActiveMQ's broker configuration file.  In the installation directory of the broker you will find the conf directory which holds multiple examples of different broker configuration files and such.  One such file is called camel.xml which defines a simple route.  In our example we will import this file in our broker's activemq.xml as follows which will start the camel context and associated route.

 <import resource="camel.xml"/>  

This should be added just after the ending broker element where you will see that the configuration is already importing jetty.xml.

Now that we have added a Camel route to the master broker it can be started.  Once started, you should see that the Camel Context was picked up and one route was started:

  INFO | Apache Camel 2.8.0-fuse-04-01 (CamelContext: camel) is starting  
  INFO | JMX enabled. Using ManagedManagementStrategy.  
  INFO | Found 3 packages with 14 @Converter classes to load  
  INFO | Loaded 163 core type converters (total 163 type converters)  
  INFO | Loaded 3 @Converter classes  
  INFO | Loaded additional 4 type converters (total 167 type converters) in 0.006 seconds  
  WARN | Broker localhost not started so using broker1 instead  
  INFO | Connector vm://localhost Started  
  INFO | Route: route1 started and consuming from: Endpoint[activemq://example.A]  
  INFO | Total 1 routes, of which 1 is started.  
  INFO | Apache Camel 2.8.0-fuse-04-01 (CamelContext: camel) started in 0.532 seconds  

So now that we have the master broker up and running with a Camel route deployed we are going to do the same to the slave broker, but this time we are going to edit the camel.xml slightly as follows to set the Camel Context id to camelBackup and most importantly we are going add an attribute autoStartup and set it to false to prevent the route from starting when the Camel Context is discovered:

 <camelContext id="camelBackup" xmlns="http://camel.apache.org/schema/spring" autoStartup="false">  

One last thing we need to do to the slave broker is configure the new service we created from the above code.  Copy the following configuration to your slave broker's activemq.xml:

 <services>  
   <bean xmlns="http://www.springframework.org/schema/beans" class="com.fusesource.example.CamelContextService">  
      <property name="camel" ref="camelBackup"/>  
   </bean>  
 </services>  

From the above configuration and sample code, you can see Spring is being used to inject the camel property into our Service class.  Additionally, notice the ref has been set to camelBackup which is the id we used for the CamelContext in the slave's camel.xml file.

Additionally, the broker has been configured as a slave so the broker will only be fully initialized when the master broker fails.  If you want more information on configuring ActiveMQ Master/Slave brokers, take at look at one of my early posts on Master/Slave Broker Configuration.

If you haven't done it all ready, copy the jar that was created from packaging up the code from the example above to the slave broker's lib directory.

Note:  In a production system you might want to configure this on both the master and slave broker to keep the configurations mirrored, as the routes will be started on the master as well once it is fully initialized. In this post I am keeping the required configuration to the slave broker just to demonstrate the behavior.

Test Run

Now that we have the code and configuration done, let's give this a test run by starting up the slave broker.

  INFO | Apache Camel 2.8.0-fuse-04-01 (CamelContext: camelBackup) is starting  
  INFO | JMX enabled. Using ManagedManagementStrategy.  
  INFO | Found 3 packages with 14 @Converter classes to load  
  INFO | Loaded 163 core type converters (total 163 type converters)  
  INFO | Loaded 3 @Converter classes  
  INFO | Loaded additional 4 type converters (total 167 type converters) in 0.007 seconds  
  INFO | Total 1 routes, of which 0 is started.  
  INFO | Apache Camel 2.8.0-fuse-04-01 (CamelContext: camelBackup) started in 0.512 seconds  

Looking at the output from the slave broker you can see the CamelContext is still started, however the route is not (remember we set autoStartup="false).  Now, in the terminal where the master broker is running, issue a kill to stop the broker.

If you have a look at the slave broker's output again, you can see the connector was started, openwire in this case, and the Camel route is now started.

  ERROR | Network connection between vm://broker2#0 and tcp://localhost/127.0.0.1:61616 shutdown: null  
 java.io.EOFException  
      at java.io.DataInputStream.readInt(DataInputStream.java:375)  
      at org.apache.activemq.openwire.OpenWireFormat.unmarshal(OpenWireFormat.java:275)  
      at org.apache.activemq.transport.tcp.TcpTransport.readCommand(TcpTransport.java:222)  
      at org.apache.activemq.transport.tcp.TcpTransport.doRun(TcpTransport.java:214)  
      at org.apache.activemq.transport.tcp.TcpTransport.run(TcpTransport.java:197)  
      at java.lang.Thread.run(Thread.java:680)  
  WARN | Master Failed - starting all connectors  
  INFO | Listening for connections at: tcp://macbookpro-251a.home:62616  
  INFO | Connector openwire Started  
  INFO | Apache Camel 2.8.0-fuse-04-01 (CamelContext: camelBackup) is starting  
  WARN | Broker localhost not started so using broker2 instead  
  INFO | Connector vm://localhost Started  
  INFO | Route: route1 started and consuming from: Endpoint[activemq://example.A]  
  INFO | Total 1 routes, of which 1 is started.  
  INFO | Apache Camel 2.8.0-fuse-04-01 (CamelContext: camelBackup) started in 0.036 seconds  

Conclusion

That's all there is to it, and I think you would agree starting a route from ActiveMQ slave is rather simple and easy to implement.  I'd also like to thank Hiram Chirino, an Apache ActiveMQ Founder, for pointing me in the direction of using the ActiveMQ Service Interface.

Friday, April 27, 2012

Camel: Working with Email Attachments

If your using the Camel-Mail component to handle some business logic that involves receiving email that contains attachments, then you might be interested in how these email attachments can be split into separate messages so they can be processed individually.  This post will demonstrate how this can be done using a Camel Expression and a JUnit test that demonstrates this behavior.

Recently, Claus Isben, an Apache Camel committer added some new documentation on the Apache Camel Mail component page that creates an Expression to split each attachment in an exchange into a separate message.  In addition he has included this code in Camel 2.10 and it is available as org.apache.camel.component.mail.SplitAttachmentExpression.  This class is using the ExpressionAdapter class which in Camel 2.9 is available as org.apache.camel.support.ExpressionAdpater and for Camel 2.8 and earlier is available as org.apache.camel.impl.ExpressionAdapter.

Let's have a look at the SplitAttachmentExpression:
 /**  
  * Licensed to the Apache Software Foundation (ASF) under one or more  
  * contributor license agreements. See the NOTICE file distributed with  
  * this work for additional information regarding copyright ownership.  
  * The ASF licenses this file to You under the Apache License, Version 2.0  
  * (the "License"); you may not use this file except in compliance with  
  * the License. You may obtain a copy of the License at  
  *  
  *   http://www.apache.org/licenses/LICENSE-2.0  
  *  
  * Unless required by applicable law or agreed to in writing, software  
  * distributed under the License is distributed on an "AS IS" BASIS,  
  * WITHOUT WARRANTIES OR CONDITIONS OF ANY KIND, either express or implied.  
  * See the License for the specific language governing permissions and  
  * limitations under the License.  
  */  
 package org.apache.camel.component.mail;  
 import java.util.ArrayList;  
 import java.util.List;  
 import java.util.Map;  
 import javax.activation.DataHandler;  
 import org.apache.camel.Exchange;  
 import org.apache.camel.Message;  
 import org.apache.camel.support.ExpressionAdapter;  
 /**  
  * A {@link org.apache.camel.Expression} which can be used to split a {@link MailMessage}  
  * per attachment. For example if a mail message has 5 attachments, then this  
  * expression will return a List<Message> that contains 5 {@link Message}  
  * and each have a single attachment from the source {@link MailMessage}.  
  */  
 public class SplitAttachmentsExpression extends ExpressionAdapter {  
   @Override  
   public Object evaluate(Exchange exchange) {  
     // must use getAttachments to ensure attachments is initial populated  
     if (exchange.getIn().getAttachments().isEmpty()) {  
       return null;  
     }  
     // we want to provide a list of messages with 1 attachment per mail  
     List<Message> answer = new ArrayList<Message>();  
     for (Map.Entry<String, DataHandler> entry : exchange.getIn().getAttachments().entrySet()) {  
       final Message copy = exchange.getIn().copy();  
       copy.getAttachments().clear();  
       copy.getAttachments().put(entry.getKey(), entry.getValue());  
       answer.add(copy);  
     }  
     return answer;  
   }  
 }  

From the above code you can see the Expression splits the exchange into separate messages, each containing one attachment, stored in a List object which is then returned to the Camel runtime which can then be used to iterate through the messages.  For more information on how the splitter EIP works see the Camel Splitter EIP documentation.

Now we can test this Expression by using the following JUnit test case and verify that the attachments are indeed split into separate messages for processing:

 /**  
  * Licensed to the Apache Software Foundation (ASF) under one or more  
  * contributor license agreements. See the NOTICE file distributed with  
  * this work for additional information regarding copyright ownership.  
  * The ASF licenses this file to You under the Apache License, Version 2.0  
  * (the "License"); you may not use this file except in compliance with  
  * the License. You may obtain a copy of the License at  
  *  
  *   http://www.apache.org/licenses/LICENSE-2.0  
  *  
  * Unless required by applicable law or agreed to in writing, software  
  * distributed under the License is distributed on an "AS IS" BASIS,  
  * WITHOUT WARRANTIES OR CONDITIONS OF ANY KIND, either express or implied.  
  * See the License for the specific language governing permissions and  
  * limitations under the License.  
  */  
 package com.fusesource.example;  
 import com.fusesource.example.expression.AttachmentsExpression;  
 import com.fusesource.example.processor.MyMailProcessor;  
 import org.apache.camel.Endpoint;  
 import org.apache.camel.Exchange;  
 import org.apache.camel.Message;  
 import org.apache.camel.Producer;  
 import org.apache.camel.builder.RouteBuilder;  
 import org.apache.camel.component.mock.MockEndpoint;  
 import org.apache.camel.test.junit4.CamelTestSupport;  
 import org.junit.Test;  
 import org.jvnet.mock_javamail.Mailbox;  
 import javax.activation.DataHandler;  
 import javax.activation.FileDataSource;  
 import java.util.Map;  
 /**  
  * Unit test for Camel attachments and Mail attachments.  
  */  
 public class MailAttachmentTest extends CamelTestSupport {  
   
   private String subject = "Test Camel Mail Route";  
   
   @Test  
   public void testSendAndReceiveMailWithAttachments() throws Exception {  
     
     // clear mailbox  
     Mailbox.clearAll();  
       
     // create an exchange with a normal body and attachment to be produced as email  
     Endpoint endpoint = context.getEndpoint("smtp://james@mymailserver.com?password=secret");  
     
     // create the exchange with the mail message that is multipart with a file and a Hello World text/plain message.  
     Exchange exchange = endpoint.createExchange();  
     Message in = exchange.getIn();  
     in.setBody("Hello World");  
     in.addAttachment("message1.xml", new DataHandler(new FileDataSource("src/data/message1.xml")));  
     in.addAttachment("message2.xml", new DataHandler(new FileDataSource("src/data/message2.xml")));  
     
     // create a producer that can produce the exchange (= send the mail)  
     Producer producer = endpoint.createProducer();  
     
     // start the producer  
     producer.start();  
     
     // and let it go (processes the exchange by sending the email)  
     producer.process(exchange);  
     
     // need some time for the mail to arrive on the inbox (consumed and sent to the mock)  
     Thread.sleep(5000);  
     
     // verify destination1  
     MockEndpoint destination1 = getMockEndpoint("mock:destination1");  
     destination1.expectedMessageCount(1);  
     Exchange destination1Exchange = destination1.assertExchangeReceived(0);  
     destination1.assertIsSatisfied();  
     
     // plain text  
     assertEquals("Hello World", destination1Exchange.getIn().getBody(String.class));  
     
     // attachment  
     Map destination1Attachments = destination1Exchange.getIn().getAttachments();  
     assertEquals(1, destination1Attachments.size());  
     DataHandler d1Attachment = destination1Attachments.get("message1.xml");  
     assertNotNull("The message1.xml should be there", d1Attachment);  
     assertEquals("application/octet-stream; name=message1.xml", d1Attachment.getContentType());  
     assertEquals("Handler name should be the file name", "message1.xml", d1Attachment.getName());  
     
     // verify destination2  
     MockEndpoint destination2 = getMockEndpoint("mock:destination2");  
     destination2.expectedMessageCount(1);  
     Exchange destination2Exchange = destination2.assertExchangeReceived(0);  
     destination2.assertIsSatisfied();  
     
     // plain text  
     assertEquals("Hello World", destination2Exchange.getIn().getBody(String.class));  
     
     // attachment  
     Map destination2Attachments = destination2Exchange.getIn().getAttachments();  
     assertEquals(1, destination2Attachments.size());  
     DataHandler d2Attachment = destination2Attachments.get("message2.xml");  
     assertNotNull("The message2.xml should be there", d2Attachment);  
     assertEquals("application/octet-stream; name=message2.xml", d2Attachment.getContentType());  
     assertEquals("Handler name should be the file name", "message2.xml", d2Attachment.getName());  
     
     producer.stop();  
   }  
   
   protected RouteBuilder createRouteBuilder() throws Exception {  
     return new RouteBuilder() {  
       public void configure() throws Exception {  
         context().setStreamCaching(true);  
         from("pop3://james@mymailserver.com?password=secret&consumer.delay=1000")  
             .setHeader("subject", constant(subject))  
             .split(new AttachmentsExpression())  
             .process(new MyMailProcessor())  
             .choice()  
               .when(header("attachmentName").isEqualTo("message1.xml"))  
                 .to("mock:destination1")  
               .otherwise()  
                 .to("mock:destination2")  
             .end();  
       }  
     };  
   }  
 }  

In the route you can see the spilt is using the AttachmentsExpression which was shown above.  In addition, I am using a simple processor to set the header of the exchange which contains the name of the attachment.  Then, using the CBR (content base router) the exchange will be routed to an endpoint based on the attached file.  The test case uses two mock endpoints which are used to validate the body of the message, number of attachments, attachment name, and attachment type.

The following code was used in the MyMailProcessor to set the header:

 package com.fusesource.example.processor;   
  import org.apache.camel.Exchange;   
  import org.apache.camel.Processor;   
  import org.apache.log4j.Logger;   
  import javax.activation.DataHandler;   
  import java.util.Map;   
  /**   
  * Created by IntelliJ IDEA.   
  * User: jsherman   
  * Date: 4/9/12   
  * Time: 11:39 AM   
  * To change this template use File | Settings | File Templates.   
  */   
  public class MyMailProcessor implements Processor {   
   
   private static final Logger LOG = Logger   
     .getLogger(MyMailProcessor.class.getName());  
   
   public void process(Exchange exchange) throws Exception {   
    
    LOG.debug("MyMailProcessor...");   
    String body = exchange.getIn().getBody(String.class);   
    
    Map<String, DataHandler> attachments = exchange.getIn().getAttachments();   
    if (attachments.size() > 0) {   
     for (String name : attachments.keySet()) {   
      exchange.getOut().setHeader("attachmentName", name);   
     }   
    }   
    
    // read the attachments from the in exchange putting them back on the out   
    exchange.getOut().setAttachments(attachments);   
    
    // resetting the body on out exchange   
    exchange.getOut().setBody(body);   
    LOG.debug("MyMailProcessor complete");   
   }   
  }  

Setting a up new maven project to test this out for yourself is very easy.  Simply create a new maven project using one of the available Camel maven archetypes, the camel-archetype-java should work just fine for this.  Once you have the project created you just need to copy the above classes into the project.

In addition to setting up the code you will also need to ensure the following dependencies are included in the project's pom.xml:

   <properties>  
    <camel-version>2.9.0</camel-version>  
   </properties>   
 ...   
   <dependency>  
    <groupId>org.apache.camel</groupId>  
    <artifactId>camel-mail</artifactId>  
    <version>${camel-version}</version>  
   </dependency>  
   <dependency>  
    <groupId>org.apache.camel</groupId>  
    <artifactId>camel-test</artifactId>  
    <scope>test</scope>  
    <version>${camel-version}</version>  
   </dependency>  
   <dependency>  
    <groupId>org.jvnet.mock-javamail</groupId>  
    <artifactId>mock-javamail</artifactId>  
    <version>1.7</version>  
    <exclusions>  
      <exclusion>  
        <groupId>javax.mail</groupId>  
        <artifactId>mail</artifactId>  
      </exclusion>  
    </exclusions>  
    <scope>test</scope>  
   </dependency>  

Note for the above test case I had my own class that implemented the SplitAttachmentExpression, as I was doing this before the class was added into the code base.  If you are using the latest 2.10 the SplitAttachmentExpression import should be changed to org.apache.camel.component.mail.SplitAttachmentExpression. If you are using an earlier version, simply create the class as I did using the code from above.

Monday, March 19, 2012

ServiceMix: Remote JMX Connection

I recently came across an issue where I was was unable to make a remote JMX connection to an instance of Apache ServiceMix which was running on a remote Linux server.  In this post I will document the configuration needed to make a successful remote JMX connection to ServiceMix deployed on Cent OS Server 6.2 using JConsole or VisualVM.

List of binaries used in this example:
When Apache ServiceMix is deployed to a Windows system you should be able to make a remote JMX connection using JConsole or VisualVM without an issue straight out-of-the-box.  However, with Linux there may be additional configuration required before this remote JMX connection can be made.  In order to make a remote JMX connection, the following property should be set on the JVM:

 -Dcom.sun.management.jmxremote  

A quick check of the [install_dir]/bin/servicemix script will confirm this property is being set on the Linux JVM, so why can't the connection be made?

If you are experiencing an issue making a remote JMX connection to an instance of Apache ServiceMix running on a Linux server check the following two items:

1) The result of hostname -i

 hostname -i  

If this command returns with the address 127.0.0.1 then the /etc/hosts file will need to be edited so that the hostname resolves to the host IP address.  The IP address of the host can found by running the the following command:

 [jsherman@saturn apache-servicemix-4.4.1-fuse-03-06]$ ifconfig  
 eth0   Link encap:Ethernet HWaddr 00:0C:29:85:EE:F9   
      inet addr:192.168.26.176 Bcast:192.168.26.255 Mask:255.255.255.0  
      inet6 addr: fe80::20c:29ff:fe85:eef9/64 Scope:Link  
      UP BROADCAST RUNNING MULTICAST MTU:1500 Metric:1  
      RX packets:11428 errors:0 dropped:0 overruns:0 frame:0  
      TX packets:8272 errors:0 dropped:0 overruns:0 carrier:0  
      collisions:0 txqueuelen:1000   
      RX bytes:1544128 (1.4 MiB) TX bytes:5504745 (5.2 MiB)  
      Interrupt:19 Base address:0x2000   
 lo    Link encap:Local Loopback   
      inet addr:127.0.0.1 Mask:255.0.0.0  
      inet6 addr: ::1/128 Scope:Host  
      UP LOOPBACK RUNNING MTU:16436 Metric:1  
      RX packets:680 errors:0 dropped:0 overruns:0 frame:0  
      TX packets:680 errors:0 dropped:0 overruns:0 carrier:0  
      collisions:0 txqueuelen:0   
      RX bytes:54936 (53.6 KiB) TX bytes:54936 (53.6 KiB)  

From this output you can see the IP address is 192.168.26.176

I have noticed that if the result of "hostname -i" returns something similar to the following, the remote JMX connection should still work as long as a domain has been configured on the localhost entry in /etc/hosts:

 [jsherman@saturn apache-servicemix-4.4.1-fuse-03-06]$ hostname -i  
 127.0.0.1 192.168.26.176  

If a domain has not been configured on the localhost entry then the remote JMX connection will fail.  If for some reason you cannot or choose not to have a domain on the localhost entry, you can edit the JMX serviceURL property in the org.apache.karaf.management.cfg file, which is located in the [install_dir]/etc, as follows by changing "localhost" to the host IP address, "192.168.26.176" in my case:

 serviceUrl = service:jmx:rmi://192.168.26.176:${rmiServerPort}/jndi/rmi://192.168.26.176:${rmiRegistryPort}/karaf-${karaf.name}  

Note: Normally the serviceURL should not have to be edited. However, adding the machine's IP address will allow you to connect for the above scenario.

2) The result of iptables -L -v

The second issue that may be preventing you from making a remote JMX connection is the machine's firewall. Running the above command will result in something similar to the following:

 [root@saturn etc]# iptables -L -v  
 Chain INPUT (policy DROP 0 packets, 0 bytes)  
  pkts bytes target   prot opt in   out   source        destination       
  679 56388 ACCEPT   all -- lo   any   anywhere       anywhere        
 18653 2145K ACCEPT   all -- any  any   anywhere       anywhere      state RELATED,ESTABLISHED   
   2  128 ACCEPT   tcp -- any  any   anywhere       anywhere      tcp dpt:ssh   
 Chain FORWARD (policy DROP 0 packets, 0 bytes)  
  pkts bytes target   prot opt in   out   source        destination       
 Chain OUTPUT (policy ACCEPT 12 packets, 5734 bytes)  
  pkts bytes target   prot opt in   out   source        destination       
 [root@saturn etc]#   

This shows the INPUT chain will drop all packets that do not match one of the configured rules on the INPUT chain.

To allow the remote JMX connection to be accepted I needed to add the following rules:

 iptables -A INPUT -p tcp --dport 1099 -j ACCEPT  
 iptables -A INPUT -p tcp --dport 44444 -j ACCEPT  

Which results in the following rules for the INPUT chain:

 [root@saturn etc]# iptables -L -v  
 Chain INPUT (policy DROP 0 packets, 0 bytes)  
  pkts bytes target   prot opt in   out   source        destination       
  694 57879 ACCEPT   all -- lo   any   anywhere       anywhere        
 19486 2214K ACCEPT   all -- any  any   anywhere       anywhere      state RELATED,ESTABLISHED   
   2  128 ACCEPT   tcp -- any  any   anywhere       anywhere      tcp dpt:ssh   
   0   0 ACCEPT   tcp -- any  any   anywhere       anywhere      tcp dpt:rmiregistry   
   2  112 ACCEPT   tcp -- any  any   anywhere       anywhere      tcp dpt:44444   
 Chain FORWARD (policy DROP 0 packets, 0 bytes)  
  pkts bytes target   prot opt in   out   source        destination       
 Chain OUTPUT (policy ACCEPT 19 packets, 1850 bytes)  
  pkts bytes target   prot opt in   out   source        destination       
 [root@saturn etc]#   

These rules could have been configured more securely by adding a specific source for the connection, however for this example I will accept connections from any source on ports 1099 and 44444.

The last thing you will want to do is save these changes to the iptables so that they persist a system reboot by running the following command:
 /sbin/service iptables save  

Seeing it in action

Now that the configuration has been taken care of you should now be able to make a remote JMX connection to Apache ServiceMix using the following URL:

 service:jmx:rmi:///jndi/rmi://localhost:1099/karaf-root  

Where "localhost" would be replaced by the IP address or hostname of the remote machine.

Remember that the default configuration for ServiceMix 4.4.1 requires the username/password of smx/smx on the JMX connection.

Conclusion

At first it might seem baffling as to why you are unable to make a remote JMX connection to a Linux server but the resolution is really quite simple. This issue is listed on the Oracle page regarding the FAQ of JConsole and Remote Management. Have a look at the FAQ if you have any further questions, or to see how the connection can be filtered to a specific source address.

Monday, February 20, 2012

ActiveMQ: JDBC Master Slave with MySQL

In this post I'll document the simple configuration needed by ActiveMQ to configure the JDBC persistence adapter and setting up MySQL as the persistent storage.  With this type of configuration you can also configure a Master/Slave broker setup by having more than one broker connect to the same database instance.

List of Binaries used for this Example


Configuring MySQL

Download and install MySQL.

Note for OS X users:  The dmg provides a simple install that contains a Startup Item package which will configure MySQL to start automatically after each reboot as well as a Preference Pane plugin which will get added to the Settings panel to allow you to start/stop and configure autostart of MySQL.

Once you have you have MySQL installed and properly configured, you will need to start the MySQL Monitor to create a user and database.
 macbookpro-251a:bin jsherman$ ./mysql -u root  
 Welcome to the MySQL monitor. Commands end with ; or \g.  
 Your MySQL connection id is 29  
 Server version: 5.5.20 MySQL Community Server (GPL)  
 Copyright (c) 2000, 2011, Oracle and/or its affiliates. All rights reserved.  
 Oracle is a registered trademark of Oracle Corporation and/or its  
 affiliates. Other names may be trademarks of their respective  
 owners.  
 Type 'help;' or '\h' for help. Type '\c' to clear the current input statement.  
 mysql>  

Then create the database for ActiveMQ
 mysql> CREATE DATABASE activemq;  

Then create a user and grant them privileges for the database
 mysql> CREATE USER 'activemq'@'%'localhost' IDENTIFIED BY 'activemq';  
 mysql> GRANT ALL ON activemq.* TO 'activemq'@'localhost';  
 mysql> exit  

Now log back into the MySQL Monitor and access the activemq database with the activemq user to make sure everything is okay
 macbookpro-251a:bin jsherman$ ./mysql -u activemq -p activemq  
 Enter password:   
 Reading table information for completion of table and column names  
 You can turn off this feature to get a quicker startup with -A  
 Welcome to the MySQL monitor. Commands end with ; or \g.  
 Your MySQL connection id is 28  
 Server version: 5.5.20 MySQL Community Server (GPL)  
 Copyright (c) 2000, 2011, Oracle and/or its affiliates. All rights reserved.  
 Oracle is a registered trademark of Oracle Corporation and/or its  
 affiliates. Other names may be trademarks of their respective  
 owners.  
 Type 'help;' or '\h' for help. Type '\c' to clear the current input statement.  
 mysql>exit  

ActiveMQ Broker Configuration
In the broker's configuration file, activemq.xml, add the following persistence adapter to configure a JDBC connection to MySQL.
 <persistenceAdapter>  
     <jdbcPersistenceAdapter dataDirectory="${activemq.base}/data" dataSource="#mysql-ds"/>  
  </persistenceAdapter>  

Then, just after the ending broker element (</broker>) add the following bean
 <bean id="mysql-ds" class="org.apache.commons.dbcp.BasicDataSource" destroy-method="close">  
   <property name="driverClassName" value="com.mysql.jdbc.Driver"/>  
   <property name="url" value="jdbc:mysql://localhost/activemq?relaxAutoCommit=true"/>  
   <property name="username" value="activemq"/>  
   <property name="password" value="activemq"/>  
   <property name="maxActive" value="200"/>  
   <property name="poolPreparedStatements" value="true"/>  
 </bean>  

Copy the MySQL diver to the ActiveMQ lib directory, mysql-connector-java-5.1.18-bin.jar was used in this example.

Now start your broker, you should see the following output if running from the console
  INFO | Using Persistence Adapter: JDBCPersistenceAdapter(org.apache.commons.dbcp.BasicDataSource@303bc1a1)  
  INFO | Database adapter driver override recognized for : [mysql-ab_jdbc_driver] - adapter: class org.apache.activemq.store.jdbc.adapter.MySqlJDBCAdapter  
  INFO | Database lock driver override not found for : [mysql-ab_jdbc_driver]. Will use default implementation.  
  INFO | Attempting to acquire the exclusive lock to become the Master broker  
  INFO | Becoming the master on dataSource: org.apache.commons.dbcp.BasicDataSource@303bc1a1  
  INFO | ActiveMQ 5.5.1-fuse-01-13 JMS Message Broker (jdbcBroker1) is starting  

Now you can check your database in MySQL and see that ActiveMQ has created the required tables
 mysql> USE activemq; SHOW TABLES;  
 +--------------------+  
 | Tables_in_activemq |  
 +--------------------+  
 | ACTIVEMQ_ACKS   |  
 | ACTIVEMQ_LOCK   |  
 | activemq_msgs   |  
 +--------------------+  
 3 rows in set (0.00 sec)  
 mysql>  

If you configure multiple brokers to use this same database instance in the jdbcPersistenceAdapter element
then these brokers will attempt to acquire a lock, if they are unable to get a database lock the will wait until the lock becomes available.  This can be seen by starting a second broker using the above JDBC persistence configuration.
  INFO | PListStore:activemq-data/jdbcBroker/tmp_storage started  
  INFO | Using Persistence Adapter: JDBCPersistenceAdapter(org.apache.commons.dbcp.BasicDataSource@78979f67)  
  INFO | Database adapter driver override recognized for : [mysql-ab_jdbc_driver] - adapter: class org.apache.activemq.store.jdbc.adapter.MySqlJDBCAdapter  

As you can see the second broker did not fully initialize as it is waiting to acquire the database lock.  If the master broker is killed, then you see the slave will acquire the database lock and becomes the new master.
  INFO | Database lock driver override not found for : [mysql-ab_jdbc_driver]. Will use default implementation.  
  INFO | Attempting to acquire the exclusive lock to become the Master broker  
  INFO | Becoming the master on dataSource: org.apache.commons.dbcp.BasicDataSource@2e19fc25  
  INFO | ActiveMQ 5.5.1-fuse-01-13 JMS Message Broker (jdbcBroker2) is starting  
  INFO | For help or more information please see: http://activemq.apache.org/  
  INFO | Listening for connections at: tcp://macbookpro-251a.home:61617  
  INFO | Connector openwire Started  
  INFO | ActiveMQ JMS Message Broker (jdbcBroker2, ID:macbookpro-251a.home-53193-1328656157052-0:1) started  

Summary

As you can see, it is fairly simple and straight forward to configure a robust highly-available messaging system using ActiveMQ with database persistence.

Tuesday, February 7, 2012

ActiveMQ: Master/Slave Broker Configuration

This is a followup to my previous post on configuring multiple instances of the ActiveMQ web console into a single instance of Jetty.  In this post I'll show how the pair of brokers were configured to enable them to be highly available in the event that one of the brokers should fail.  The master/slave configuration used in this example is referred to as the Pure Master Slave.  There several different types of master/slave configurations including Shared File System Master Slave and JDBC Master Slave, the latter of which I will look at in a later post.

Pure Master/Slave Configuration

There is not much to configuring a master/slave pair with ActiveMQ, in fact the configuration needed is a single attribute added to the slave broker.  In the slave broker's configuration file (activemq.xml) you will need to add the masterConnectorURI attribute to the broker element as follows:
 <broker xmlns="http://activemq.apache.org/schema/core" masterConnectorURI="tcp://localhost:61616" brokerName="amq1S" dataDirectory="${activemq.base}/data">  

Essentially, all you need is the one attribute above.  However, if you need to provide credentials for the connection, then you can use the following alternative configuration to connect to the master:
 <services>  
   <masterConnector remoteURI="tcp://localhost:61616" userName="User1" password="pass1"/>  
 </services>  

The URI specified should be the connection URI for the master broker.  This allows the slave to make a connection to master as shown below:
  INFO | ActiveMQ 5.5.1-fuse-01-13 JMS Message Broker (amq1S) is starting   
  INFO | For help or more information please see: http://activemq.apache.org/   
  INFO | Connector vm://amq1S Started   
  INFO | Starting a slave connection between vm://amq1S#0 and tcp://localhost:61616   
  INFO | Slave connection between vm://amq1S#0 and tcp://localhost/127.0.0.1:61616 has been established.   
  INFO | ActiveMQ JMS Message Broker (amq1S, ID:macbookpro-251a.home-53545-1328657220277-1:1) started  

From the output you can see the slave is aware of the master broker and has made a connection.  This connection allows the slave broker to stay in sync with the master by replicating the master broker's data store.  Once the slave detects the master has failed it will complete it's start up process by starting all it's connectors:
  ERROR | Network connection between vm://amq1S#0 and tcp://localhost/127.0.0.1:61616 shutdown: null  
 java.io.EOFException  
      at java.io.DataInputStream.readInt(DataInputStream.java:375)  
      at org.apache.activemq.openwire.OpenWireFormat.unmarshal(OpenWireFormat.java:275)  
      at org.apache.activemq.transport.tcp.TcpTransport.readCommand(TcpTransport.java:228)  
      at org.apache.activemq.transport.tcp.TcpTransport.doRun(TcpTransport.java:220)  
      at org.apache.activemq.transport.tcp.TcpTransport.run(TcpTransport.java:203)  
      at java.lang.Thread.run(Thread.java:680)  
  WARN | Master Failed - starting all connectors  
  INFO | Listening for connections at: tcp://macbookpro-251a.home:62616  
  INFO | Connector openwire Started  

At this point, the slave is knowledgable about all events processed by the master and additional processing can continue without interruption.

The documentation on configuring a pure master slave ActiveMQ instance also contains some optional parameters that you may find useful if you plan to implement this type of master/slave configuration that will ensure the master and slave broker's data stores stay in sync.  Hit the link to see these additional parameters, and how they are used.

Download

Want to give this a try?  Download the latest FuseSource distribution of ActiveMQ.

Summary

Configuring a Master/Slave ActiveMQ instance is easy.  With one simple attribute you can create a highly available ActiveMQ messaging platform.

Friday, January 20, 2012

ActiveMQ: Configuring Multiple Instances of the Web Console

When configuring multiple instances of ActiveMQ brokers in master slave configurations it may be useful to configure the web console for each broker in a single Jetty instance.   This will allow you to use a single URL to access each of the brokers by simply changing the URL context.

We will configure the ActiveMQ brokers using two master slave pairs as follows:

AMQ1M - AMQ1 Master
AMQ1S - AMQ1 Slave

The web console to service these brokers will be configured as: http://localhost:8080/amq1

In the event that AMQ1M should fail, this url will then failover to AMQ1S.

AMQ2M - AMQ2 Master
AMQ2S - AMQ2 Slave

The web console to service these brokers will be configured as: http://localhost:8080/amq2

In the event that AMQ2M should fail, this url will then failover to AMQ2S.

This configuration allows the URL to be descriptive by identifying the brokers it is servicing while keeping port configuration to a minimum by utilizing a single Jetty instance.

So with the concept out of the way lets look at the configuration that will make this happen.

Note: In this example I will be using the FuseSource distribution of ActiveMQ.  Below is a list of binaries used to setup this example.  However, the instructions provided should work with both the Apache and FuseSource distributions.

  • apache-activemq-5.5.1-fuse-01-13
  • activemq-web-console-5.5.1-fuse-01-13.war
  • jetty-distribution-7.5.4.v20111024.zip

Step 1.
Grab a Jetty distribution from the Eclipse Jetty download site.  Once downloaded, extract the zip or tar.

Step 2.
Add the activemq-all-x.x.x-fuse-xx-xx.jar to the Jetty /lib directory.

Step 3.
Down the ActiveMQ web console war.  This can be obtained via the FuseSource repo: activemq-web-console.  Explode the activemq-web-console-x.x.x-fuse-xx-xx.war to Jetty's web apps directory in a web context named amq1.  Repeat this, and create web context amq2.  Once the war is exploded we will need to add some JNDI configuration to each webapp's web descriptor (WEB-INF/web.xml).  At this point you should have a directory structure that resembles the following:

webapps
     |_amq1
     |_amq2

Step 5.
For each of the web application's (amq1 and amq2) web descriptor files (WEB-INF/web.xml) we are going to add the following JNDI configuration:

 <!-- ========================================================== -->  
 <!-- JNDI Config -->  
 <!-- ========================================================== -->  
 <resource-ref>  
     <res-ref-name>jms/connectionFactory</res-ref-name>  
     <res-type>javax.jms.ConnectionFactory</res-type>  
     <res-auth>Container</res-auth>  
 </resource-ref>  
 <resource-ref>  
      <res-ref-name>jmx/url</res-ref-name>  
      <res-type>java.lang.String</res-type>  
 </resource-ref>  
 <resource-ref>  
      <res-ref-name>jmx/user</res-ref-name>  
      <res-type>java.lang.String</res-type>  
 </resource-ref>  
 <resource-ref>  
      <res-ref-name>jmx/password</res-ref-name>  
      <res-type>java.lang.String</res-type>  
 </resource-ref>  

Step 6.
Then create jetty-env.xml files for each of the web applications.  The jetty-env.xml is used to configure the JNDI resources specific to the application and the file will reside in the WEB-INF/ directory.  In each file, the ConnectionFactory and JMX URL will be specified.

For amq1 the jetty-env.xml will be configured as follows:

 <?xml version="1.0"?>  
 <!DOCTYPE Configure PUBLIC "-//Mort Bay Consulting//DTD Configure//EN" "http://jetty.mortbay.org/configure.dtd">  
 <Configure id="amq1" class="org.eclipse.jetty.webapp.WebAppContext">  
   <New id="connectionFactory" class="org.eclipse.jetty.plus.jndi.Resource">  
     <Arg><Ref id="amq1"/></Arg>  
     <Arg>jms/connectionFactory</Arg>  
     <Arg>  
       <New class="org.apache.activemq.ActiveMQConnectionFactory">  
         <Arg>admin</Arg>  
         <Arg>admin</Arg>  
         <Arg>failover:(tcp://localhost:61616,tcp://localhost:62616)</Arg>  
       </New>  
     </Arg>  
   </New>  
   <New id="url" class="org.eclipse.jetty.plus.jndi.Resource">  
     <Arg><Ref id="amq1"/></Arg>  
     <Arg>jmx/url</Arg>  
     <Arg>  
       <New class="java.lang.String">  
         <Arg>service:jmx:rmi:///jndi/rmi://localhost:1199/jmxrmi,service:jmx:rmi:///jndi/rmi://localhost:1299/jmxrmi</Arg>  
       </New>  
     </Arg>  
   </New>  
   <New id="jmxuser" class="org.eclipse.jetty.plus.jndi.Resource">  
     <Arg><Ref id="amq1"/></Arg>  
     <Arg>jmx/user</Arg>  
     <Arg>  
       <New class="java.lang.String">  
          <Arg>admin</Arg>  
       </New>  
     </Arg>  
   </New>  
   <New id="jmxpassword" class="org.eclipse.jetty.plus.jndi.Resource">  
     <Arg><Ref id="amq1"/></Arg>  
     <Arg>jmx/password</Arg>  
     <Arg>  
       <New class="java.lang.String">  
          <Arg>admin</Arg>  
       </New>  
     </Arg>  
   </New>
 </Configure>  

For amq2 the jetty-env.xml will be configured as follows:

 <?xml version="1.0"?>  
 <!DOCTYPE Configure PUBLIC "-//Mort Bay Consulting//DTD Configure//EN" "http://jetty.mortbay.org/configure.dtd">  
 <Configure id="amq2" class="org.eclipse.jetty.webapp.WebAppContext">  
   <New id="connectionFactory" class="org.eclipse.jetty.plus.jndi.Resource">  
     <Arg><Ref id="amq2"/></Arg>  
     <Arg>jms/connectionFactory</Arg>  
     <Arg>  
       <New class="org.apache.activemq.ActiveMQConnectionFactory">
         <Arg>admin</Arg>  
         <Arg>admin</Arg>   
         <Arg>failover:(tcp://localhost:63616,tcp://localhost:64616)</Arg>  
       </New>  
     </Arg>  
   </New>  
   <New id="url" class="org.eclipse.jetty.plus.jndi.Resource">  
     <Arg><Ref id="amq2"/></Arg>  
     <Arg>jmx/url</Arg>  
     <Arg>  
       <New class="java.lang.String">  
         <Arg>service:jmx:rmi:///jndi/rmi://localhost:1399/jmxrmi,service:jmx:rmi:///jndi/rmi://localhost:1499/jmxrmi</Arg>  
       </New>  
     </Arg>  
   </New>  
   <New id="jmxuser" class="org.eclipse.jetty.plus.jndi.Resource">  
     <Arg><Ref id="amq2"/></Arg>  
     <Arg>jmx/user</Arg>  
     <Arg>  
       <New class="java.lang.String">  
          <Arg>admin</Arg>  
       </New>  
     </Arg>  
   </New>  
   <New id="jmxpassword" class="org.eclipse.jetty.plus.jndi.Resource">  
     <Arg><Ref id="amq2"/></Arg>  
     <Arg>jmx/password</Arg>  
     <Arg>  
       <New class="java.lang.String">  
          <Arg>admin</Arg>  
       </New>  
     </Arg>  
   </New>  
 </Configure>  
Step 7.
Before starting the Jetty instance we need to make sure it is enabled to use JNDI. This can be done by editing the [jetty]/start.ini file. The following items need to be added to the options list: plus and annotations. This ensures these jars are loaded. You also need to add etc/jetty-plus.xml to configurations files near the bottom of the file.  The results of these changes should look as follows in the start.ini file:

 #===========================================================  
 # Start classpath OPTIONS.  
 # These control what classes are on the classpath  
 # for a full listing do  
 #  java -jar start.jar --list-options  
 #-----------------------------------------------------------  
 OPTIONS=Server,jsp,jmx,resources,websocket,ext,plus,annotations  
 #-----------------------------------------------------------  
 #===========================================================  
 # Configuration files.  
 # For a full list of available configuration files do  
 #  java -jar start.jar --help  
 #-----------------------------------------------------------  
 #etc/jetty-jmx.xml  
 etc/jetty.xml  
 etc/jetty-plus.xml  
 # etc/jetty-ssl.xml  
 # etc/jetty-requestlog.xml  
 etc/jetty-deploy.xml  
 #etc/jetty-overlay.xml  
 etc/jetty-webapps.xml  
 etc/jetty-contexts.xml  
 etc/jetty-testrealm.xml  
 #===========================================================  


Step 8.
Now we can start jetty using the following command:
java -Dwebconsole.type=jndi -jar start.jar

This command informs the brokers' web consoles to use the JNDI properties to provision the ConnectionFactory and the JMX connection.

Step 9.
In addition to the master/slave configuration required for the ActiveMQ brokers, which I will cover in my next post, we also need to disable the Jetty configuration.  The default configuration file for ActiveMQ is activemq.xml located in the /conf directory of the broker.  At the bottom of this file you will find an import tag that is used to import the resource: jetty.xml.  This should be commented out as follows:


<!--<import resource="jetty.xml"/>-->


Step 10.
Now we are ready to start our master/slave configuration of brokers.  For each broker run the following command:


./bin/activemq console


The Result of This Configuration
Now lets take a look at how the web console and Jetty behave with this configuration.  In your browser navigate to http://localhost:8080/amq1.  You should see that this connects you to broker amq1M which is the master in the amq1 pair.
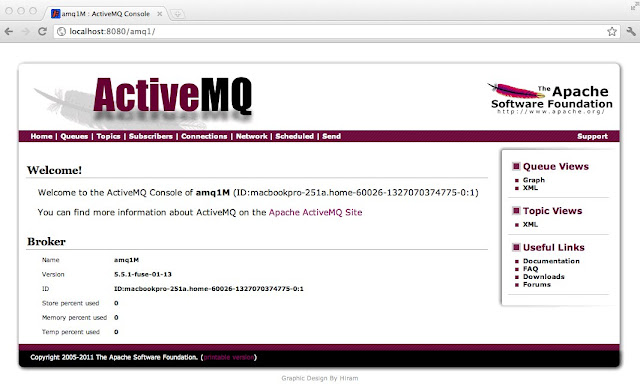
ActiveMQ - amq1M (Master)

Now if we go to the terminal where the broker amq1M was started and issue a 'control c' command to kill it, when the browser is refreshed the connection will failover to broker amq1S which is the slave in the amq1 pair.
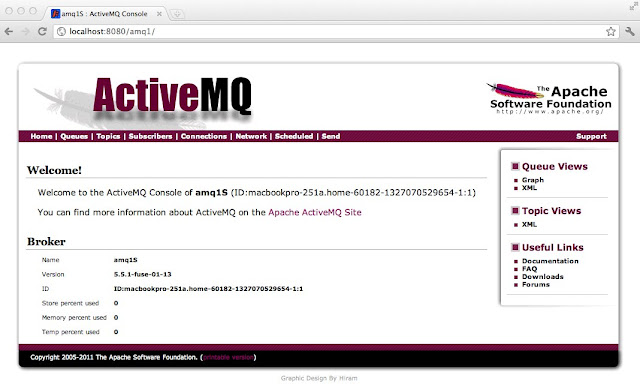
ActiveMQ - amq1S (Slave)

To check on the amq2 broker pairs, navigate to http://localhost:8080/amq2.  You should see this connects you to amq2M which is the master in the amq2 pair of brokers.
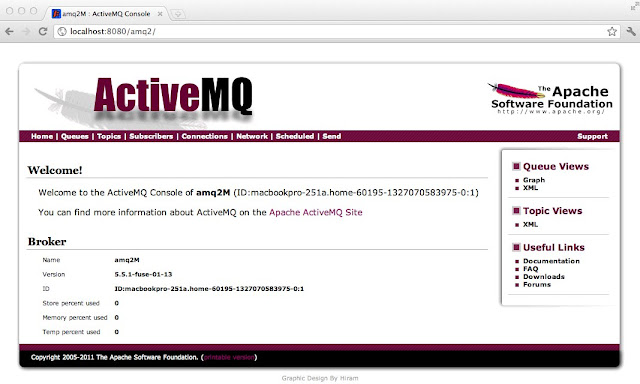
ActiveMQ - amq2M (Master)

Again, if we go to the terminal where the broker amq2M was started and issue a 'control c' command to kill it, when the browser is refreshed the connection will failover to broker amq2S which is the slave in the amq2 pair.
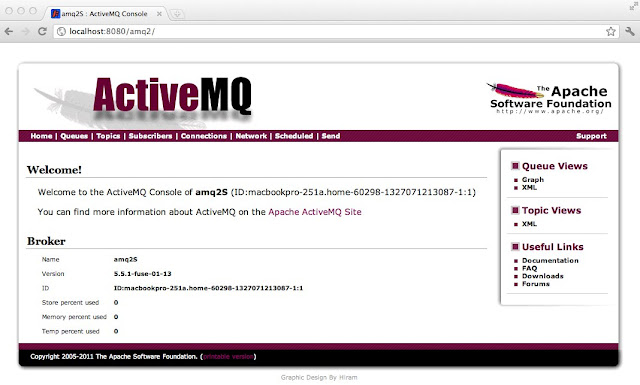
ActiveMQ - amq2S (Slave)
Summary
Using this configuration to set up multiple instances of ActiveMQ broker pairs in a single Jetty instance you can see how it could simplify managing and accessing the web consoles for all brokers as the environment scales to support many instances of ActiveMQ master/slave pairs.  This eliminates the need for each individual broker to have separate URLs and ports to access the web console.  In a followup to this post I will show how the brokers were configured to support a master/slave configuration.